

Hi! I'm Ayn and I am a Ga. Pre-K teacher, serving 4 and 5 year olds in an inclusive setting. I share my classroom adventures on my blog, little illuminations.
Discovery bottles are a great way for young children to observe, explore and experiment a wide array of scientific concepts. One of the great things is that they are virtually no-cost to make. I use recycled juice, soda or water bottles, a filler of some sort (dry or wet) and a discovery material.

Bottles:
- Recycled water bottles (work fine, but can be thin and less durable for wear)
- Recycled Gatorade or juice bottles work great and have a wider opening for larger objects
- Fancy recycled bottles: When I come across fancy bottles, I can just imagine the possibilities! I love this Fiji water bottle---it has a back ground picture on the back that shows through, and details on the front that add depth. I peeled the top of the front label down and cut off the brand, so that I just have a lovely bottle to fill. I am always on the lookout for interesting shapes of bottles, too!

(Photo from: http://logodesignpictures.com/fiji-water-bottle)
 |
| (Photo from: http://logodesignpictures.com/fiji-water-bottle) |
Wet fill suggestions:
- water
- clear/tinted shampoo
- baby oil
- vegetable oil
- colored hair gel
- clear/tinted body wash
Dry fill suggestions:
- sand
- rice
- confetti
- oats
- salt
- orzo pasta, or other small pasta (Alphabet pasta makes a fun bottle!)
- dirt
- small beads
Discovery items can be almost anything imaginable:
- shells
- beads
- sharks teeth
- buttons
- dice
- water beads
- trinkets
- small toys (Legos, figures, cars, etc.)
- small shaped erasers
- confetti
- beads
Here are some of my favorite discovery bottles in my classroom:
Dried-Out Marker Experiment:
At the beginning of the year, we talk about the importance of putting the tops back on the markers to prevent them from drying out. Inevitably, there are always a few dried up markers lurking in the marker box. I demonstrate the the marker is no longer usable. Then I talk about how the ink could have lasted longer, had the cap been replaced. We place one of the dried out markers into a full bottle of water and begin to observe. Almost immediately, a thin stream of ink will drift down. One disturbed, the ink will mix with the water to color it the color of the marker ink. We build on this experiment throughout the year, by using two markers in one bottle ( blue and yellow) to observe color mixing . Another variation is to compare two bottles, one with a regular marker and one with a permanent marker or "Sharpie". The Sharpie will not bleed color!


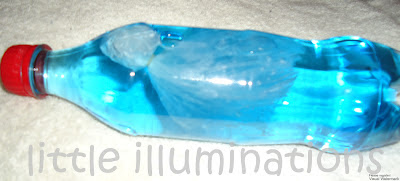
Fancy Wave bottle:
I have several of these in my discovery center, and each one is a little different. Using the Fiji bottle with background shown above, I added water, baby oil, glitter and some food coloring. (We let the decorative bottle do most of the work here. :)


Ocean bottle:
This bottle has shampoo, sand and small shells.

Ocean bottle #2:
This bottle has water, sand and small shells.

Ocean bottle #3:
This bottle has water, sand and small shells.

Ocean bottle #3:
This variation uses small ocean animal toys, confetti, foam fish cutouts, and ocean confetti.

Shark's Teeth:
We visit the beach every summer and finding shark's teeth has become a family obsession. I usually come home with anywhere from 20-40 each summer. They are usually pretty small, so they are perfect to put in a discovery bottle.

Viscosity bottle:
This is such a simple bottle, just water, food coloring and vegetable oil. Shake and watch the oil bead up within the water!


Tornado in a bottle:
I usually use one of those little screw on tornado tubes to attach two bottles together, but someone made this for me and it does the tornado a little differently. Put water and a small ball of aluminum foil in a tall bottle, seal and shake in a circular fashion.

Googly eye bottle:
This is definitely one of the most fun bottles! Fill the bottle with shampoo or oil and add googly eyes, the kookier, the better!


Water Beads:
We have been exploring with water beads this year and decided to add some to a discovery bottle.


Floral Beads:
I found these clear floral beads at the dollar store and thought a little tinted water in the background would make them interesting to observe. We got quite a surprise! The part of the bottle that was filled with water made the beads invisible! They blended into the water, so it gives the impression that the beads are resting on top of the water!


Jellyfish discovery bottle:
I saw this on Pinterest, and HAD to try it! It is by far, one of my favorite bottles, ever! I took a clear, thin plastic produce bag and cut it into a large square. I made a little bubble, blew into it and tied it off. I cut the remaining ends into little strips for tentacles and pushed it into a mostly filled bottle. After pushing the bag through, I filled the rest of the bottle and capped it. This was a process of trial and error, because although I had seen the idea on Pinterest, it was my dumb luck that when I saw it, my "pin" didn't go through and I couldn't find the directions. Of course, an hour after I finally finished, I found this great tutorial on bhoomplay's blog. If you are interested, definitely head over there for more precise directions, and clearer pictures!

Glitzy Glam bottle:
I used baby oil as the base and added alphabet beads, pony beads, glitter and confetti. It's very eye catching!

Sink or Float:
Fill just a little more than half way, then add a collection of small items that will sink and a few things that will float!


Pom pom bottle:
Just pom poms and air!

Magnetic items bottle:
I cut up a variety of brightly colored pipe cleaners and paper clips. Use a magnet wand to try to move items within the bottle.

Static Electricity:
Use discovery bottles to explore static electricity by adding some tissue paper and mylar confetti to a bottle. Rub on your shirt or hair and watch the particles cling to the sides of the bottle!

Yarn:
Although many of the bottles I've posted here today are tried and true staples in my classroom, in preparation for this post, I remade some of the older bottles and added a few new ones. This afternoon, I got quite a surprise when two of the afterschoolers (3rd and 5th grade) that share my room in the afternoon called me over to see what they were making. They made a discovery bottle with the plastic water bottle label and some yarn. I think it is a pretty cool bottle, especially since the kids made this completely on their own!

Sand and magnetic letters:
We made this one on the playground last year. We took some magnetic letters put them in a wide mouthed bottle and added some sand from the playground. The bottle can be shaken to find letters, or a magnetic wand may be used.

Find the letters:
This bottle is filled with salt and paper stars with letters printed on them.


Once Upon a Time bottle:
I had these wonderful little theme buttons left from another project. I added some brightly colored shape erasers and some star confetti to colored rice.

I Spy bottle:
Just like the game! Find a small collection of items and take a picture of them. Them place them in the bottle and add rice.


There really are no limits to your creativity when it comes to making discovery bottles!

Stop by and visit me anytime at littleilluminations.blogspot.com or visit the little illuminations fanpage on facebook!


Now that is a lot of fun learning to share! Those ideas certainly will create a lot of brain connections!
ReplyDeleteThanks, Deborah! The kids are really excited about them this year, so I hope that will help with those connections, too! :)
DeleteThese are beautiful Ayn - We have been working on our making our own bottles too! I love all the different kinds you share here! I mean wow!!
ReplyDeleteOh - and Ayn, We love those Fuji Bottles too! I buy them all the time just to use as our discovery bottles:) My family just laughs at me:)
ReplyDeleteThanks, Deborah! When you go through life as a preschool teacher, you end up looking at the things in life differently than most others. I am almost embarrassed to covet everyone else's garbage and recycling! (Notice I said "almost embarrassed" ;)
Deletei have retired this year, but when the children went to see the miami seaquarium, we use to make the ocean bottles, we would use small bottles that they children could handle, we would use baby oil cause its clear not like vegetable oil its make it cloudy and some water, not alot and mostly all baby oil and we would use food coloring and put tiny objects of the ocean inside of the bottle. after that was done, i used super glue to permantly keep the cap on for the child. it was a great acitiviy for the kids....
DeleteThere are home runs and there are grand slams!!!! This is just such an incredible, amazing encyclopedic reference. I hope that our readers will pin and repin this article..... it deserves a gazillion readers.
ReplyDeleteAyn, you have really done such an amazing job!!! Thanks for your continued and outstanding "sharing" here. We are all so appreciative.
Debbie
Thanks, Debbie! Just like potato chips, I couldn't pick just one! ;)
DeleteI agree this is a total grand slam! Wow! Shark teeth, google eyes, so much variety! These bottles are not only fun but you have gone to great lengths to inspire us all to try these. Just amazing! Carolyn
ReplyDeleteThanks, Carolyn! Each one seems to inspire an idea for another one! :)
DeleteI don't even know HOW to categorize this on Pinterest .. so many categories for this to fall under!
ReplyDeleteMy favorite new bottles that you mentioned ... static electricity and googly eyes!! :-)
I love those two, too! I had some really kooky eyes--I wish I had saved more of them for this!
DeleteShark teeth?!?! How cool! Love this post!
ReplyDeleteThanks, Stephanie! :)
DeleteWOW! What an awesome collection of discovery bottle ideas. I am featuring it tomorrow over at http://sugarsnips.com/.
ReplyDeleteThanks for sharing, Mary! :)
DeleteI make a batch of 'science bottles' each year, but you have trumped me big time Ayn. Shark teeth! I would never had thought of that & me in big shark country too. You have set a really high standard there. let's see who is up to it.
ReplyDeleteFOR ANYONE THAT USE OIL, ALWAYS USE BABY OIL IN THE PLASTIC BOTTLE, ITS CLEAR. THE VEGETABLE OIL THAT YOU COOK WILL MAKE IT CLOUDY,ALWAYS BABY OIL IN THE BOTTLES....
ReplyDelete