Thursday, May 31, 2012

Beyond the Beach

Beyond the Beach!
Summer Themes for Keeping Learning Going All Summer Long


It's summertime, summertime, sum-sum-summertime!!!!! And in the summer, we see a lot of "going to the beach," "down by the ocean," and vacation-themed activities with our little people. While of course everyone can (and probably should) do a beach-related theme each summer, there is more to summer than fun in the sun and sand. Just because school's out for summer doesn't mean little brains are vacationing from learning. Learning happens all the time! Here are some ideas to keep your summer fun, interesting, and theme-based while continuing the learning:

BUBBLES

  • Blowing Bubbles
    • Make bubble solution (involve the children): 1 c water; 2 T light kayro syrup; 4 T dishwashing liquid; few drops food coloring (optional). Refrigerate for longer life (and let age a few days to make bubble blowing easier)
  • Make bubble blowers
    • poke holes in bottoms of paper cups; dip rims in bubble solution and blow through the holes
    • make 1" slits on the ends of straws; bend strips back; dip the bent ends of straws into bubble solution and blow through the other end (make sure children understand the difference between blowing and sucking!)
    • tape 4 to 6 straws together in a bundle for each child; dip one of the ends of the straw bundles into the bubble solution and blow through the other ends.
  • Let children take turns blowing all the bubbles they can with one breath. Have the rest of the children count the bubbles. (math connection)
  • Have the children blow bubbles and look at them closely. When the reflection from the sun hits the bubbles, a rainbow of colors can be seen. Ask children to look for the different colors and name the ones that they see. (science connection)

BUBBLES ALL AROUND ME
Sung to:  “My Bonnie Lies Over the Ocean”
The bubbles flew over the flowers.
The bubbles flew over the trees.
The bubbles flew over the grass.
So many bubbles, I see.
Bubbles, bubbles
As pretty as bubbles can be.
Bubbles, bubbles
Popping all around me.
                        Jean Warren
NOTE: Add a Girl Scout twist and have the children stand up every time they hear the word "bubbles" and sit down right after. Start the song off slowly, then speed it up. HILARIOUS!

CAMPING


  • Set up a Camping Center. A 3-person tent will actually fit inside a 12' x 12' room. Consider setting one up at least for a portion of the day. Tents can also be made by draping sheets or vinyl table cloths or large pieces of plastic. Other items to consider for the camping center:
    • battery operated lantern
    • flashlights
    • pieces of wood to make a campfire
    • pots and pans 
    • sleeping bags
    • dress up clothes (boots, flannel shirts, jackets, hats, gloves, etc.)
    • backpacks
    • fishing pole (and pretend fishing pond or stream)
    • cooler
    • walking sticks
    • books about nature
    • maps
    • CD or recording of sounds of nature
  • Create a "stream" or rocky path using blue butcher paper and smooth stones
  • Print materials to consider
    • Eric Carle book about insects a
    •  hiking guides
    • maps
    • other "big people" books and reference materials
    • Cub Scout/Girl Scout/Campfire Girls handbooks
    • Nature magazine
    • Books with real pictures of plants and animals
    • We're Going on a Bear Hunt
  • Props to make/use
    • Forest mural
    • Backpack
    • rain ponchos (from shower curtain liners and duct tape to make seams; children can decorate with markers or stickers)
    • First aid kit (with child-friendly items like band-aids)
    • Binoculars (tape two toilet-paper rolls together; let children decorate)
    • Trail mix for snack (can be made with or without peanuts)
    • Materials for children to make their own hiking maps

FLAGS

  • Choose a few flags from countries children are likely to hear about (USA, Canada, & Mexico are good starts) and help them identify them; discuss the differences in the flags and the meanings for things on the flags (like what the maple leaf signifies)
  • Talk about the special days coming up this summer when flags will be seen around town like Flag Day (June 14) and 4th of July
  • Have children pretend they are flags hanging on poles in the wind. Play a version of Simon Says (wave like there is a gentle breeze; wave like you are in a storm; there is no wind)
  • Make flags by stapling paper on straws (could be child-made or teacher made flags) and do flag parades (use a John Phillip Sousa march to help you out like "Stars and Stripes Forever")
    • Using flags can also help you with transitions -- If you have an American Flag, please go wash your hands/line up/etc. Follow with other flags to help decrease time waiting in line.
  • Set up a flag making station in the art center. Encourage children to make their own flags that represent them just like each country has a flag that represents that country.
  • Flag match ups
    • Print a variety of flags out (go to google images to find pictures of flags in a nice, user-friendly size; you can copy and paste flags into a MSWord document....print 2 of each flag)
    • Attach each flag to 3x5 card
    • Mix up the cards and let the children take turns finding the matching pairs of flags
  • A great website to find out information and images for every country's flag is Flags of the World (be sure your pop-up blocker is turned off)
  • Do a flag ceremony -- Click Here for detailed Girl Scout flag ceremony ideas AND excellent historical and etiquette information for how to handle and retire American Flags (has great facts for grown ups about our flag!)

THE SUN


  • Make sun puppets -- Let children use yellow construction paper, yellow yarn, and a craft stick and with your help create a little sun puppet (children decorate 2 pieces of yellow construction paper circles and glue yarn on; help children glue circles together with the craft stick in between as a handle). Children can use their sun puppets during songs or stories related tot he sun.
  • Sun prints -- Set dark colored construction paper in direct sunlight. Have children place objects on the paper. At the end of the day, have children remove the objects and report on what has happened.Talk with them about why this might have happened.
  • Read the book "Sun Up, Sun Down" by Gail Gibbons
  • Make a Sunshine Shake -- combine 6oz unsweetened frozen orange juice concentrate; 3/4 c milk; 3/4 c water; 1 tsp vanilla; 6 ice cubes in blender and blend (makes 4 servings)
  • Discuss the important ways we need to protect ourselves from the sun (sunscreen, sunglasses, hats, hydration, don't look directly at the sun, etc.)
  • Talk about the helpful qualities of the sun
  • Look at real pictures of the sun (google images is a great resource for this as well)
  • Focus on the color yellow and the shape of a circle. Talk about whether or not the real pictures of the sun are yellow/circle

WHALES


  • Make paper bag whales 
  • Have children stuff paper bags with crumpled sheets of newspaper. Have different sized paper bags available. Tie tops of bags closed to make whale talks. Let children paint bags to represent whales. Add eyes with construction paper or markers (after paint dries). Using different colors of paints and different sized bags as well as allowing children to choose how full to stuff their bags will help with process vs product issues.
  • Whales matching/counting/file folder game
  • Cut whale shapes and whale spout shapes out of different colors. Use contact paper to laminate (if you don't have access to a laminator). Put whales contact papered/laminated on the inside of a file folder. Laminate spouts; cut out; place in zip top bag. Children can match the spouts to the whales to practice color matching.
  • Listen to humpback whale sounds. Encourage children to mimic the sounds. Ask children to listen carefully and try to repeat the whale song they heard. A great video of a humpback whale song can be found here.
  • National Geographic Kids has excellent information about a variety of whales. Click here for info about Blue Whales.
  • Discuss the differences between whales and fish (whales are mammals, breath air, live births, etc.).
  • Incorporate whale movement in your water play activities.
  • Make a giant mural of the ocean and add the paper bag whales to it.

NOTE: Several ideas were generated from the books Theme-asaurus I & Theme-asaurus II edited by Jean Warren.

Blog entry by Dr. Ellaine B. Miller, PhD. Family Child Care Partnerships at Auburn University. www.humsci.auburn.edu/fccp

Wednesday, May 30, 2012

Critters in the Classroom

There is just something absolutely magical about having real critters in the classroom!

Right now, my little ones are absolutely engrossed in observing the monarch eggs hatch into caterpillars. It is super simple to find monarch eggs and caterpillars for observation. Monarchs only lay their eggs on milkweed plants. If you learn to identify milkweed, you will be able to find everything you need for a butterfly life cycle study!


We also recently acquired "Bowser" a red eared slider turtle. He/she has been one of the biggest attractions for the children.  We have been learning about turtle care, and love to watch Bowser swim and bask in the "sunlight." We have also discovered that whoever said that turtles were slow moving creatures must not have seen them when they are hunting a fish!


In the past, we also hatched chickens from eggs, 


We watched eggs hatch into tadpoles, grow into froglets and become frogs.


We've borrowed bunnies from the farm,


We have observed fiddler crabs. Did you know that when they molt, the opposite claw becomes the larger claw for the males? So much for being able to tell our clawed friends apart based upon which claw was the larger one!


We have all kinds of fish in our tank, it is mesmerizing to watch. Even our youngest friends find it captivating to sit and watch them swim.  We have quite a few snails too, and like the turtle, they tend to move quite quickly when they want to!

Earthworms are one of our favorite critters too!


Of course, our loyal watch dog "Scooby" is another one of the children's favorites!

The children love to help to care for, observe and interact with all of the critters!

Do you have any critters in your classroom?


 More About Amy

Amy Ahola is the owner/operator of Child Central Station, group home daycare and educational toy store in Marquette, Michigan.  She has been running her own business since 2005. Prior to that time, Amy worked in a childcare center and public school. In addition to her childcare business, Amy also provides educational training sessions. Amy earned a Bachelors of Science in Psychology from Northern Michigan University and a M.S. in Training, Development, and Performance Improvement.  For more information about any of her programs, please visit Child Central Station or Find her on Facebook


Tuesday, May 29, 2012

Ten-Frames and Number Sense

For young children, developing number sense is critical, and manipulatives play an important part that process. 
But are all manipulatives created equal?  When we consider that true number sense involves understanding of quantity as it relates to place-value, then the answer may surprise you.
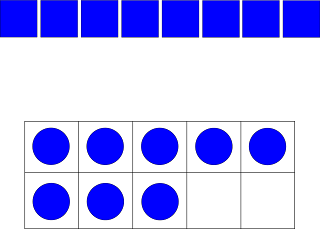
Look at the two different representations of the quantity eight:

www.teachthemath.com

Though it is important to give children experiences with a wide range of tools, which model would be a more useful tool for building understanding of number?

For many students, the first representation would be much too abstract.  In order to verify the quantity, they would have to count each tile or cube one by one.  However, when they see eight on a ten-frame, they are able to identify the quantity of eight as it relates to ten.  This visual may be more helpful in developing and retaining the sense of ten. 
Seeing quantities as instantly recognizable without having to recount from one is an important step in the stages of counting.  Students develop cardinality when they can understand that the final number they counted represents the quantity of objects in a set.   The ability to subitize comes later when students can instantly recognize a quantity of objects.
The use of a ten-frame helps children build mental images, develop the ability to subitize, and foster understanding of part/whole relationships, all important in strengthening a foundation for later work with place-value.  The use of manipulatives such as cube-trains, though helpful in early states of counting, does not provide an instantly recognizable and distinct picture of the wholeness of ten.
The use of the ten-frame also aids in assessing a student’s ability to reason abstractly, construct viable arguments about mathematics, and look for and make use of structure – three of the Mathematical Practice Standards within the Common Core. 
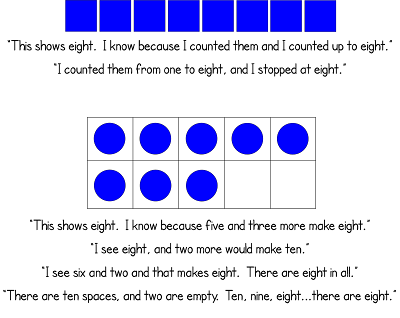
Consider these student’s responses to the following mathematical models of eight:
www.teachthemath.com
Ten-frames easily show the order and organization of our base-ten number system.  They provide students with the flexibility of counting each dot individually, or seeing a quantity of dots as combinations of smaller groups of dots.  Students can also see a particular quantity and it's relation to ten.  More importantly, a student is able to develop multiple strategies for counting quantities and understand the connections between them. 
If you have not made use of the ten-frame in your classroom, I encourage you to try it!  You can download a free set here.  Happy counting!! 
 www.teachthemath.com
Thanks for reading along.  Be sure to visit my blog and say hello!  You can find it here.

www.teachthemath.com
Photobucket

www.teachthemath.comDr. Penny Messick is an Instructional Specialist with the Alabama Math, Science, and Technology Initiative (AMSTI).  She spent 25 years teaching K-2 and is a strong supporter of inquiry based learning.  She spends most of her days providing resources and professional development for elementary teachers across south Alabama.  Penny blogs at www.teachthemath.com.  She can also be found on Facebook, Twitter and Pinterest

Monday, May 28, 2012

Flower Book Mark - Crafts from Red Ted Art

Hello! It is great to be back again and visiting from over at Red Ted Art, where I love to make classic kids crafts with my two pre schoolers. And I love that Spring is here again - finally you can get out and about, get some fresh air, a little sunshine and enjoy nature coming "back to life again". Leaves are sprouting, we are growing seedlings (you may enjoy our fun Grass Heads!) and flowers are popping up everywhere. Perfect for a little flower craft. Today, we would like to share our "Flower Bookmarks"!
   

This is almost a “cheats” way to pressing flowers. It is quick and easy and fun. The children love it as it is a surprisingly tactile craft. It may even encourage a little reading, or you can make these for school books and friends. Materials: Small flowers & leaves. Again, we tried not to pick any “real” flowers, but just some blossom off a plentiful bush, some contrasting little green leaves and the much abundant Daisy. Masking tape. Colour card. Sticky back plastic or contact paper. Hole punch. Ribbon. 1. Collect your flowers, we then arranged them by colours in little dishes.

  flower book marks 

2. Cut out a piece of contact paper and tape it, sticky side up, onto the table. It is a bit fiddly, due to stickiness of paper, but persevere
  flower crafts 
 3. Place all your flowers onto the contact paper – place them face down, as this is the side you will see
 4. Carefully peel off masking tape and stick card down
   

5. Cut to size. Punch a hole and add some ribbon. Done!

Don't you think they look pretty? We certainly had fun making them. And they made a lovely little gift for Granny! For other flower inspired crafts, check out our FIMO Flower Cards (so easy, so cute), our Fingerprint Flower Cards, Blossom Fairy Lights (gorgeous) and our Flower Collage! Enjoy crafting.

Sunday, May 27, 2012

Under the Sea in the Style of Montessori


Under the Sea in the style of Montessori


The warm weather, the birds singing in the trees and the smell of flowers in the air always gives me and the kids the summer itch.  We are all screaming to get outside and have fun.  One way that I try to tame the Summer Itch is by bringing summer into our classroom.  We have 2 weeks left of school and our last unit is under the sea.  We have transformed our classroom into an underwater playground.  We study a different sea life animal everyday and extend the learning by adding a new work to our shelf and by making a corresponding craft or art project.  We have studied whales, sharks, and rainbow fish.  Tomorrow, we will be learning about crabs.  We will continue our study with sea horses, star fish, octopus, walruses and jelly fish.  Keeping the kids engaged and making learning fun right up to the very end of the school year is challenging but necessary.  Hopefully these ideas will give you some inspiration for last minute centers or works to add to your classroom or shelves at home. 

For the last month we have been reviewing the skills we have learned throughout the year.  The works that are out on the shelves for this unit are also a review of skills already learned.  As the weather permits we will bring school outside often.  Here are some pictures of what we are working on this week. 
This is our Sea Life Sensory Box.  I make a new sensory box for every theme.  This has crinkle paper, beans, small blue and green pasta, blue sand and sea life creatures.  There are scoops, buckets and tongs for the kids to explore and practice scooping, tonging and tweezing skills. 
This is a basic counting and matching Montessori Work.  The children will match the number of shells to the correct number and place them in numerical order.  It will reinforce one to one correspondence and numerical order. 
Here is a sea shell transfer using tongs and star fish ice cube trays.  This work although basic will reinforce one to one correspondence, left to right tracking, fine motor skills and hand eye coordination.
For Alphabet matching I wrote upper and lowercase letters on these shells.  The children will simply match the shells with the matching letter.
After we read "The Rainbow Fish" I put this work on the shelves.  It is shapable foam similar to play dough and colored gems to make the Rainbow fish. 
These are real starfish that have been dyed. The children sort and grade these. They have been working with knobless cylinders all year, this is an extension to the same skills used for grading knobless cylinders.
 
For this art, I gave the children squares of foil paper and a cd. They cut out the foil pieces and placed them on the fish wherever they chose. They also put the cd anywhere on the fish. This child chose to use the fish for part of the eye and put a wiggly eye in the center. I thought that was pretty clever!
These are just a few of our Sea Life Works. If you would like to see more works and art that we are doing for our Sea Life unit you can visit www.discoverykidzone.blogspot.com

 I have a Sea life pinterest board with a ton of fun ideas that could also be used at home throughout the summer.  http://pinterest.com/kidzoneteacher/sea-life-theme/
Rachel Supalla is the mother of 4 kids ages 3-9. She has taught preschool and Kindergarten for 15 years. Rachel is a Montessori certified teacher and director. She owns Discovery Kidzone Montessori Adventures where she blogs about teaching in a Montessori school and homeschooling. Rachel homeschools her daughter who has ADHD.  Rachel is also the owner of Discovery Kidzone Montessori School.  You can contact Rachel on facebook at Kidzone Teacher Mama and you can find her pinning on pinterest here!

Saturday, May 26, 2012

Books and activities about firefighters

By Laura Eldredge

This month our preschool focused on community helpers ... and this week was all about firefighters.  We always start off the week with discussions about fire safety (talking about having a meeting spot, why we have fire drills at school, stop-drop-roll, etc).  We also read several books - which are always very helpful in illustrating the topic even further. 

Books we read this week


This book talks about the life of a firefighter, their bravery, and how they save a pet.  An important lesson for young children (for them to get out of the house and allow the firefighters to save your pet).


This book shows firefighters on the move!  Simple rhyming text is good for young children.


Another rhyming book, this one really highlights the parts of a fire engine (which many young children are fascinated by).  When reading this, we focused on what the firefighters wear (helmet, fire jacket and pants, mask).  We want children to remember not to HIDE if there is a fire - and not to be scared if they see a firefighter wearing a mask.  Firefighters are there to help them.


Put the fire out activity

To extend our learning of firefighters, we had the children make their own pretend building out of Lego or Duplo bricks (or other building blocks).   Then we gave them orange play dough and had them use that as the pretend fire on their building.


Next, we gave them plastic Duplo people (and other plastic figures from our block center) to pretend that those are the fire fighters. Using a piece of blue pipe cleaner, we attached that to the figure to simulate the fire hose. (When we did this, at first the hose looks very much like a "light saber" or sword!  Yikes!) However, not one child pretended it was that. They were all very engaged in their buildings and putting their fires out! 


We also used this activity as an opportunity to encourage our older 4's and 5's to cooperatively play in small groups. By giving them a limited number of bricks to work with, they could only make small structure. But, if they worked together and shared the bricks, they could make taller towers and work together to put their fires out.


Firefighter visit

The highlight of the week is the visit from the local fire department!   When that truck comes in (lights and sirens going), most every kid is super excited and in awe (though we always do a have a few who are more tentative about it). 


The firefighters are great ... letting the kids tour the truck, putting on all the gear, and letting the kids spray water from the hose!  If you are able, I highly recommend inviting your local firefighters to visit your school or child care center! 


Laura Eldredge is a teacher and curriculum coordinator at a NAEYC accredited early childhood program in Connecticut. She also co-founded the website
The SEEDS Network, as a way to provide early childhood professionals with ideas and resources that support them in their quest to provide quality care and education to our youngest learners. She blogs at www.theseedsblog.com.

Friday, May 25, 2012

Adapted Art

I am so excited be a guest blogger today.  My name is Amanda Myers and my regular blog is A Special Kind of Class.  I have truly taught a special kind of class for 20 years.  The 7 children in my class each year have either a physical and/or speech disability.    Many of them do not speak at all and many have little to no fine motor skills. This makes participating in the regular school program challenging.  My job is to figure out the best way for them to participate and learn before sending them back to their home school board.  I thought I would share a little about how I adapted an art project for my students.  Adapting lessons for children with special needs often does not require any special skills, just a willingness to think outside the box.  Oftentimes ordinary items can be used.  Most of the items featured below came from Lakeshore.  They were not specifically designed for children with special needs but are easy to use.  I hope my post inspires you to try something new with your students.


Related Posts Plugin for WordPress, Blogger...