Showing posts with label first grade. Show all posts

Tuesday, December 15, 2020

Montessori-Inspired Resilience Activities Using Free Printables

By Deb Chitwood from Living Montessori Now

Growth mindset is so important for everyone, and we could all use some extra resilience this year and going into next year. So I have free resilience activities and printables for you today! You'll also find a resilience-themed newsletter subscriber freebie at LivingMontessoriNow.com

Montessori-Inspired Resilience Activities Using Free Printables
You'll find many activities for preschoolers through first graders throughout the year along with presentation ideas in my previous posts at PreK + K Sharing. You'll also find ideas for using free printables to create activity trays here: How to Use Printables to Create Montessori-Inspired Activities
 
At Living Montessori Now, I have a post with resource links of Free Printables for Montessori Homeschools and Preschools. 

Disclosure: This post contains affiliate links (at no cost to you).

Montessori Shelves with Resilience-Themed Activities

Montessori Shelves with Resilience-Themed Activities

You’ll find Montessori-inspired resilience numbers, letters, and and more (part of my subscriber freebie pack, so just sign up for my email to get the link and password … or check the bottom of your latest newsletter if you’re already a subscriber) Go to my Free Resilience Printables and Montessori-Inspired Resilience Activities {Growth Mindset Unit} post at Living Montessori Now for the free printables and activity ideas you see on the shelf and collage above!

Free Montessori-Inspired Resilience Pack

Montessori-Inspired Resilience Pack


Montessori-Inspired Resilience Pack for DIY Cards and Counters, Number or Letter Matching, Number or Letter Basket, Bead Bar Work, Hands-on Math Operations, Number or Letter Salt/Sand Writing Tray, Letter Tracing, DIY Movable Alphabet, and Creative Writing (subscriber freebie, so just sign up for my email to get the link and password – or check your inbox if you’re already a subscriber).

Growth Mindset Resources and Activities

Peace and Mindfulness Resources and Activities (which are also helpful for resilience)

If you'd like ideas for calendar-based themes throughout December and January, see my December Themed Activities for Kids and January Themed Activities for Kids.

Be sure to go to my Free Resilience Printables and Montessori-Inspired Resilience Activities {Growth Mindset Unit} post  at Living Montessori Now for lots of free printables and activity ideas!
 
I hope you find these helpful and are able to have a resilient new year! :) 

Deb - Siganture
Deb Chitwood

Deb Chitwood is a certified Montessori teacher with a master’s degree in Early Childhood Studies from Sheffield Hallam University in Sheffield, England. Deb taught in Montessori schools in Iowa and Arizona before becoming owner/director/teacher of her own Montessori school in South Dakota. Later, she homeschooled her two children through high school. Deb is now a Montessori writer who lives in San Diego with her husband of 45 years (and lives in the city where her kids, kids-in-law, and grandkids live). She blogs at Living Montessori Now.
Living Montessori Now Button

Friday, January 17, 2014

The Biggest Best Snowman!


This week we did a mini-unit on Snowmen. I don't know who had more fun, me or the kiddos!! We started the week off by brainstorming materials needed to build a snowman. Here is the list that my kinders came up with:


The next day I read the book The Biggest Best Snowman by Margery Cuyler. I really do love this book...for several reasons. But if you haven't read it, be sure to pick it up and check it out.


 After reading the book, I asked students to tell me what steps we would take to build a snowman. As I called on the students, I wrote down each step in turn. They were pretty detailed in their directions.


 After building the list, I noticed that they had used the same words throughout their directions, so we went through and circled the reoccurring words that were new to us. These words then became our new sight words for the week and the directions became our new poem for the week. The best part about it, the kiddos WROTE this POEM!!! They were so proud to take ownership. They wanted to change the title though. Instead of "How to Build a Snowman"...they changed it to "I Made a Snowman".

On Wednesday, we did a following directions activity. I gave each student a white piece of paper and students drew a snowman based on the directions I gave. Step by step, just like the students had told me the day before, I gave them directions. I also talked about using all of the space that they are given, meaning, don't make a teensy tiny snowman when they have a whole sheet of paper. This is how some of their snowmen turned out:


Thursday, I had students work together with a partner to make a snowman on a large piece of poster board. Again, I stressed the importance of an artist using the whole canvas to make their masterpiece, not just a tiny corner. When assigning partners, I pulled names out of our pick-sticks and the two names that I pulled out at the same time were partners. This was probably my favorite activity of the whole week. I watched them work so well together to design very unique snowmen/snowwomen!


When they were finished, I had the pairs stand up and talk about the snowman/woman that they drew. The one on the left has Santa in his sleigh being pulled by two reindeer. Very creative and they must be missing Christmas ;)


 Then today, Friday, students worked by themselves to build their own snowman with construction paper. The only materials they could use were scissors, glue and construction paper.


 Then lastly, I typed up the poem that the students wrote, and we illustrated them to help us remember the words. We also highlighted the new sight words that were learned this week. Then students glued the poems in their PIG (Poetry Is Great) folders and took home to read to their family.


And to top it all off, we ended our week with snowfall and more in the forcast for tomorrow! So, hopefully students will be able to go out and build their own REAL snowman with the freshly fallen snow this long three day weekend!


 Carie is a kindergarten teacher from Illinois who writes on the 17th of each month. She shares her experiences and ideas from her classroom, reading, writing, math, Art, and several other fun and exciting things!
Carie also writes her own blog: 

88

Sunday, January 5, 2014

IMPROVISATION GAMES for IMPROVED LITERACY

IMPROVISATION CAN CONNECT TO LEARNING 

Welcome back to my blog and Happy New Year!  If you're new to me, I'm Enrique and I work with children, teachers and parents all over the world through my F.A.M.E. Foundation and through Context Method/MyTown Music.  Using artistic approaches to elevate how anyone learns is what we do.

I have used improvisation games for many years.  At first I used them to simply let the young learners have a break in their day that was fun.  Then I realized how much learning was taking place naturally, especially related to language, both spoken and embodied.  One of my favorite improv games is called TAXI.

I had played this game with K - 5 students, where the students become a passenger and/or driver in a taxi cab.  Each student becomes an emotion and embodies that emotion with what they say and do.


I hadn't yet tried the game with middle and high school students, but once I did, I found it was huge hit with that age group!


Then, I thought I should try it with adults in our professional development sessions, and WOW, did they love it.  They were as engaged as actors were.  I found that many adults had an actor/actress inside them wanting to come out and play!


Then about 3 months ago, I tried this game with preschool children and the result was…. the children wanted to play the game over and over again.  Below is an image from Gregory Sidor's blog "Everybody's a Comedian: An Easy Improv Party Game.  I encourage you to check it out.  It's a great resource.  Below are the essential steps I take when I engage preschool children in this game that elevates learning in many ways.


STEP 1: With children sitting in a circle demonstrate emotions with your own face and body and have the children guess which emotion you are.  Encourage children to volunteer to be the one demonstrating the emotion.  This step can go on for days, if not weeks.  Let it happen.  You're building skill level for the actual Taxi Improv game.

STEP 2: Place 4 chairs in the middle of the rug with children sitting around them.  Demonstrate with your fellow teachers or some visiting parents.  The first person, the driver of the taxi cab, chooses an emotion but doesn't tell anyone what it is.  This individual becomes this emotion with what they say and how they use their body language as they enter the taxi and begin to drive.

STEP 3: The 2nd person chooses their own emotion without telling anyone and enters the taxi embodying that emotion.  THE TAXI CAB DRIVER, the first person, does their best to become the emotion of the 2nd person.  

STEP 4: The 3rd and 4th individuals do the same as the 2nd person.  In the end, 4 emotions will have been experienced.

NOTE: It is a very good idea to write down a list of emotions the children know on a board of some type to help them have a visual of what the word looks like and to help them have a selection to choose from.  Grow this list of words over time.

With young children, you'll most likely be starting with words like "Happy", "Sad", "Mad", and "Funny."  Remember to not underestimate the children's abilities.  Start with those kinds of words and take the risk to extend on those words.  For example, once they know "Happy", you can introduce "Excited", which they probably know, and go on to words like "Exuberant."


Have fun and remember that fun IS NOT fluff!  Fun is where it's at.  Fun is an INVITATION to the learner to create and discover! To read more about improvisation, check out my book/e-book Living Like a Child!
Enrique
Founder, F.A.M.E. Foundation
Co-Founder, Context Method
Film Composer


Tuesday, December 17, 2013

Quick and easy gifts and a FREEBIE


Christmas is quickly approaching! Do you have all of your parent gifts done? Do you have them wrapped? Do you have student gifts ready?? So much to do with the time quickly passing! Only EIGHT, I repeat, EIGHT days until Christmas! Can you believe it?? But that means only 3 more days until break for mehow about you? Are you already on your Christmas break?
If you are panicking about what to do for parent gifts this year here are a couple quick and easy ideas. 

Handprint Mittens:
Materials:
·       mitten cutout or pattern
·       Small heart pattern or cut out
·       White paint
·       Paintbrush
·       Cold hands, warm heart print out
·       Hole punch
·       Pipe cleaners
·       Student pictures
·       Markers

Directions:
·       Students cut out the mittens
·       Students Write: Love, Student 2013 on the back of the mitten
·       Teacher paints their hands and students place them in the mitten.
·       While paint is drying, cut out hearts and cold hands, warm heart sayings.
·       Glue heart in center of hand and saying down by the fingers.
·       Glue the child’s photo in center of the heart.
·       Laminate (optional)
·       Paper punch to of mitten and ring a pipe cleaner through the hole.
Easy as 1 – 2 – 3~


Tissue Paper Wreaths:
Materials:
·       Student pictures
·       Small white paper plate (or white circle cut outs)
·       Small red circle cut outs (for center of the wreath)
·       Red and green tissue paper cut in small squares/rectangles
·       Glue
·       Pencils
·       Paper Punch
·       Pipe cleaners
·       Scratch paper

Directions:
·       Students glue the little red circle in the center of the white paper plate/circle
·       Students take scratch paper and put a big glob of glue on it.
·       They take their pencils, wrap a piece of tissue paper around the eraser end of the pencil and dip it in the glue and glue it around the edge of the white circle. Repeat this step until all of the white is filled in with tissue paper interspersing a few red pieces of tissue paper (holly berries)
·       Glue student picture in the center

   Easy as 1 -2 -3

What do you get your students for Christmas?? I used to spend money on books and all kinds of goodies but a few years ago I realized that a pad of paper and a pen was a HUGE HIT! So, that is what I do, I head to the dollar store and find cute pads of paper and fun gel pens. The kids get so excited because they now have their OWN pad of paper to keep notes on. 


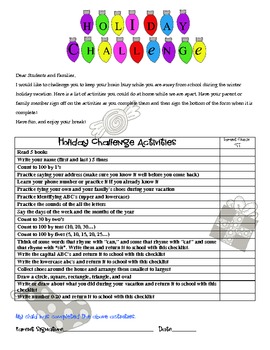
Also, do you have your students do anything over break?? For those of you who didn't know, I like to have my students continue to practice certain skills so I send home a Holiday Challenge packet. It is filled with simple activities for them to do at home, to keep their brains busy. The students who return it after break get a special prize...usually a trip to my treasure box.

Holiday Challenge

Click here for a copy of the packet!

Enjoy and I hope you have a VERY MERRY CHRISTMAS!! And a HAPPY and SAFE NEW YEAR!

Tuesday, September 17, 2013

Teaching Kindness and Acceptance

I just adore Chrysanthemum...How can you not fall in love with this sweet, cute, precious little mouse?? Even my students love her!


This year, we kicked off the year using the book Chrysanthemum by Kevin Henkes, to teach our unit on names. After reading the book to students and completing the activites, I had to ask myself, "Why have I never used this book to teach names, acceptance, kindness and respect for ourselves and others? WHY WHY WHY??"

 On the first day I just read the story to students and let them discuss what we read.

One the second day, before I read the story, I had a large red heart that I showed the children. We talked about how nice and pretty the heart was without any crinkles or markings on it. Then I told the children that each time they heard hurtful words, to crumple up the heart. I got this idea from Nancy over at First Grade W.O.W! Click on the link to take you directly to her post on this particular Chrysanthemum mini unit and to get other ideas! (She has some really great ideas for teaching social skills, I love her blog!)

At the end of the book, our heart was crumpled and it actually even tore a little bit. This brought us to the discussion of how words that we use can be hurtful and when we use hurtful words, they make a mark on someones heart that can't be fixed. I showed that students that once a heart is broken...or crinkled, it may never be the same...we can't smooth out the heart after those words are said...we can't take back hurtful words. I let that soak in for a little bit and let the students discuss their feelings and if someone has ever hurt them.

Day 3, I read the story yet again and this time we talk about ways to help heal someones heart or keep it from getting hurt. Some of the ideas my students came up with were: Saying I am sorry, not using those words at all, being kind to everyone, not  making fun of others and helping others.
After that discussion, we took our band-aides and helped to heal Chrysanthemum's heart and attached a poem to the center that reads: Before you speak, think and be smart. It's hard to fix a wrinkled heart!


Day 4 - Students made their own Chrysanthemum! The kiddos were so proud of them and I must say, they turned out adorable! We also made speech bubbles, from Chrysanthemum that say "I think the name _________ is perfect! Love, Chrysanthemum" I made this into our bulletin board for the quarter, to remind my students to always think before they speak.

Day 5: I let the kiddos act out the story as I narrated. Since this was our first acting of the school year, of course many of the students were shy and not sure what to do, but they tried their best and NO ONE made fun of each other...and that is all that mattered because that meant, the lesson taught them exactly what it was supposed to :)

And I must say after doing this mini unit, I hear my students complimenting each other all day long, every day! It is such a wonderful sound...music to my ears.


 Carie is a kindergarten teacher from Illinois who writes on the 17th of each month. She shares her experiences and ideas from her classroom, writing about reading, writing, math, Art, and several other fun and exciting things!
Carie also writes her own blog: 

Kindergarten Hugs

Sunday, February 17, 2013

Celebrating Dr. Seuss

Hi! I am Carie from Kindergarten Hugs! I hope you are having a wonderful weekend!


We will be celebrating the work of Dr. Seuss during the last week of February to take us right into READ Across America Day on Friday, March 1!  It all starts with teachers reading Seuss books and doing Seuss inspired activities all week long. We also have special dress days throughout the week! Click here to see the list! Our READ Across America committee puts together a letter that goes out to our staff to prepare them for the whole week! See that letter here. Then for the grand finale on Friday evening, our school hosts a "Dr. Seuss Family Night".

 Friday is the day of Seuss week that the students LOVE the most so, I wanted to share what we do on that Friday, with you today!

We usually begin the day with an assembly where a local judge comes in, has the children raise their right hand and recite the "Readers Oath".  Then teachers put on their own production of "Green Eggs and Ham" and "The Grinch" and sometimes classes will perform skits or poems as well. Then the students sing a Seuss chant to end the assembly. We also have guest readers from the community come in throughout the day and read a Dr. Seuss book to our classes! Community members include (but are not limited to): Police officers, firemen, local radio personalities, local business owners and doctors. Our guest readers then remind our students to come and join us in the evening for a fun filled night of laughter, togetherness, reading and games! Throughout the day, classes are making and eating special Seuss treats; whether they be cupcakes, cookies or any other treat! This year, my class will be making Seuss Hat treats! Made with Ritz crackers and gummy lifesavers stuck together with vanilla frosting! YUM!

Then comes....


DR. SEUSS FAMILY NIGHT! 
which includes...

Free- Family- Fun

Students and their FAMILIES are encouraged to come and enjoy a FREE evening at the school filled with lots of FUN!

The doors open at 6p and as families are walking in the door they are able to sign up for door prizes (usually brand new hard cover Seuss books or stuffed Seuss characters). Then they are free to choose where to go and what to do next! Families enjoy the night of games and craft projects that are based on a variety of Dr. Seuss books. Some of the activities include: 
  • Seuss Treat Making
  • Guess How Many Fish? (we have a fishbowl full of goldfish crackers)
  • Family Read (families can bring their own blankets or use ones provided to read books together on the gym floor. They also get to choose a free book to take home with them).
  • The School Book Fair (this is usually the busiest place the whole night and the first year we will not be having it the same week as Seuss :(  )
  • Seuss Bingo
  • Oobleck 
  • Crafts
  • Cake Walk
  • Bucket toss
  • Bulls-eye toss 
  • Pictures with a Seuss Character (Some of our staff and their family members dress up as Suess Characters such as Who-ville characters, Horton, Cat-in-the-hat, Sam I Am etc... 

Here are some pictures of our staff dressing up!

Characters from Who-ville!

Another Who-ville character! 

 Our Seuss Night brings in approximately 400 people to help celebrate Dr. Suess' Birthday! We always have a blast as a staff! As do the kiddos and their family members! Where else can a whole family go for free these days? Not many places! AND they will come home with lots of prizes, treats and a free book or 2!

I would love to hear how you celebrate READ Across America!
Related Posts Plugin for WordPress, Blogger...