Wednesday, January 25, 2012

Connecting With REAL, LIVE Authors

I am a kindergarten teacher and, being a kindergarten teacher, I encounter real, life issues with my kiddos.  Like what you ask?  Hmmmm...let me count the ways. Tattling, interrupting, picking noses, fidgeting, worrying, oh my! 
I was fortunate enough to stumble upon a wonderful book entitled A Bad Case of the the Tattle Tongue which led me to an incredible author named Julia Cook.  As a former school guidance counselor, Julia speaks to children in a way they understand through her literature.  She understands their viewpoint and their stance in life as little people with big expectations. 

Since discovering Julia's amazing, educational line of books, I have had the opportunity to team up with Julia to do the Julia Cook Project at Mrs. Miner's Monkey Business.  My students are helping me "review" and use a variety of her intuitively written books in the classroom and they are loving it!  (They would much rather have her "telling" them to not do something than hearing me say it AGAIN!).
Please join up with The Julia Cook Project at Mrs. Miner's Monkey Business to find out more about Julia and what I've been doing in my classroom with her books.  Also, grab some of my freebies that correspond with Julia's amazing books that I have posted for my readers:


Lastly, do not miss the opportunity for your class or someone you love's class to win a once in a lifetime opportunity to SKYPE with a famous author.  They can meet Julia Cook, discuss her books with her and ask any questions they may have!  This is an opportunity for your students that they will never forget and how incredible is it that Julia has agreed to do this for one of my readers??
Be sure to follow along with the Julia Cook Project, so you don't miss the announcement of the contest which will be coming up within the next month (after more books and freebies are added)!
Come on over!


Tuesday, January 24, 2012

Take the music outside and play!


Just 6 of my 60+ homemade instruments.
Welcome to my first post for PreK + K Sharing!

I’m Alec Duncan from Child’s Play Music in Perth, Western Australia. I’m a qualified early childhood educator and I’ve been working with young children since 1988, originally in child care and out of school hours care programs.

Since 1998 I’ve been facilitating hands-on play-based instrumental music programs with young children, using homemade instruments I make mainly from junk and recycled materials.

I'm passionate about play-based learning in all its forms, but naturally my focus is on music in the early years. I want all children to experience the joy of learning music through play so my first post is all about how you can radically increase opportunities for music play in your program.

I'm of Scottish heritage.  While I draw the line at wearing a kilt or eating haggis, like many Scots I love a bargain.  And the best sort of bargain is a freebie.  Most of these ideas won't cost you a cent, and they may just save your sanity too!

Music and the power of play-based learning

The natural way for young children to learn anything is through free, self-directed play. Just as children should have free access to blocks for construction and to props for dramatic play, musical instruments should be available on a self-choice basis so they can learn about music through free play and exploration. But in a classroom that can sometimes present real problems.

Music play tends to be loud. Sometimes too loud, especially inside in a classroom. A few children exploring instruments can create an amazing level of noise that can interfere with other children’s play and learning, and have you muttering: "the noise is driving me nuts!"

Often educators respond by restricting access to instruments, or only using them in structured group times, or by enforcing a “play quietly” rule. That’s understandable, but there’s a better way:

Take your music program outside!

Your outdoor playground area isn’t just a place for children to let off steam – it’s a learning environment that is just as important as your classroom, maybe more so. There is nothing – absolutely nothing – which you can do indoors that you can’t do outdoors. There are many learning experiences that can only happen outside. And some things just work better outdoors, and music for young children is one of them.

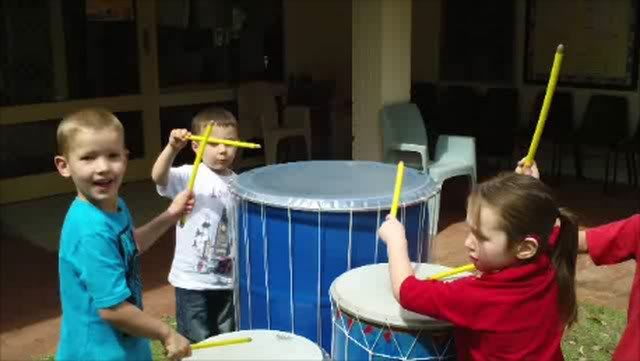
In my music programs I use homemade drums like these:

These drums are loud!  I mean, really loud!

Would you want those drums inside? No way, and neither would I; but in the open air the volume level is greatly reduced. The sound doesn’t echo and reverberate the way it does indoors and you have ample room to space your instruments away from other activities.

Music play is instantly easier to implement. Free choice of music play by children becomes something that’s pleasant and natural, and children love the freedom that outdoor music making brings.

Many of your indoor instruments will work just fine outside, though you do need to think about the weather – you don’t want your instruments being rained on. Choose instruments that are rugged and loud, like drums, tambourines, bells, wooden tone blocks, shakers, guiros and metal or wooden xylophones. Set them up on tables or mats, or on a grassed area and watch the children flock to them!

Keep your delicate quiet instruments for indoor use – and since they are quiet you can have them available at all times. You’ve just vastly increased your children’s access to music play – and kept your sanity at the same time. Bonus!

But, wait – there’s more!

It’s not just the noise factor that makes the outdoor area so perfect for music play. You have space to create music stations and music walls, using recycled and re-purposed junk. No worries about these instruments being rained on!

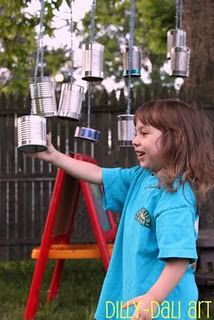
Music stations can be as simple or as complex as you want to make them:

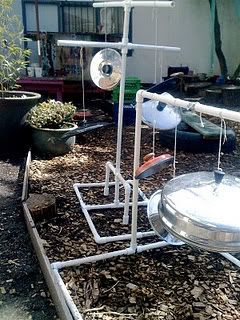
How simple is this?
A modular PVC frame - no need to glue it.
Source: Dilly-Dali Art ......................................................Source: Teacher Tom

A nice mix of found objects and "real" instruments

Creating a music station is easy and it’s a wonderful project to do with young children. Don’t just build it yourself – involve the children at every stage of the design and construction, for maximum learning. It can be an ongoing project, with children keeping your music station fresh and interesting by continually adding new objects as instruments.

Real tools = real learning
Source: Teacher Tom

You can extend your fixed music station with loose parts. Metal garbage cans make great “thunder drums”, and large PVC containers work really well. Cardboard boxes are great too, and for added melodic interest try random lengths of PVC pipe played on the end with a rubber sandal. Diameters from 40mm upwards work best.

Nice homemade xylophone - and loose parts drums

Check my Pinterest boards for more images of music stations and loose parts.

Want more instruments?  You have them already!

Maybe you don’t have many “real” musical instruments available to you. Not a problem: your outdoor area is jammed full of instruments already! No, really – they just don’t look like musical instruments.

Playground equipment and outdoor features make wonderful instruments in their own right. Practically anything can be a musical instrument if it can make a sound.

Watch this short video of 4 and 5 year old children spontaneously exploring their playground (you might want to turn your speakers down – this is pretty loud!)


That’s pretty impressive, although in their enthusiasm to explore they seem to have forgotten my rule about walking with drumsticks. Tsk, tsk.

What else works?

  • Fences, forts, climbing frames, gutter down pipes, drinking fountains, tricycle frames, – anything metal or wood.
  • Plastic forts, ride-on toys, large waffle blocks (make a cube of them for a cajon you can play while sitting on it), plastic playground barrels – put a shovel-full of small stones or bark chips inside and you have the world’s largest shaker.
  • Any rough textured object can become a scraper or guiro – concrete paving, bricks, asphalt, tree trunks with rough bark – use sticks or scrubbing brushes for scraping.
  • Natural materials like dry leaves, sticks, bark, stones, hollow logs – all can create interesting and unique sounds

The only limit is your imagination – if it can make a sound and is relatively unbreakable then it can be a musical instrument. Explore your area with your children to find all the sounds; I guarantee both you and the children will be amazed at the range of sounds – and they won’t cost you a cent.

Get up and boogie!

Your outdoor area is also perfect for movement to music. Children have the freedom to make large movements safely, and if you have small portable musical instruments that children can carry while playing, movement to music comes instinctively.

Dance, dance, dance!

Dance is fundamental to children’s understanding of music – and it’s also fantastic exercise! In a time when we are all becoming more concerned about children’s reduced physical activity, movement to music is a wonderful way to get kids up and active. Often children who don’t normally choose gross motor activities will respond enthusiastically to movement to music.

There's so much you can do with music and play outdoors! 

One last thing:

Yes, your outdoor area can be a wonderful place for music play - but I'm not say it should be the only place. I'm hoping that these ideas will extend your music program and make it even more vibrant.  A great music program is one that uses your whole environment, indoors and outdoors, and offers children a wide range of music activities and play opportunities.

So, yes, a free choice of music activities is important but so are more structured play-based activities at circle or mat time, so are extensive opportunities for singing and music to movement throughout the day, so are listening stations where children can listen to the recorded music of their choice.  It's all about offering a rich, diverse and engaging music program for children to explore the joy and wonder of music.

Until my next post:

Have fun - and keep playing!
If you've enjoyed this post check out my blog at Child's Play Music, where you will also find video tutorials on making simple musical instruments with children.  You can find Child's Play Music on Facebook too.  And Pinterest!
Proudly linked to: Hands on: as we grow - it's playtime! No Time for Flash Cards - Link & Learn; Adventures in Mommydom - Science Sunday; Beneath the Rowan Tree - Playdate; playing with words 365 - Thrifty Thursday; Homeschool Creations - Preschool Corner; Toys in the Dryer - Fun Stuff Fridays; Mama Pea Pod, Greening Sam & Avery, Learning for Life - Outdoor Play Party; Living Life Intentionally - TGIF Linky Party; NurtureStore - The Play Academy; Child Central Station - Outdoor Classroom Inspiration.

Monday, January 23, 2012

Don't Toss Those Containers

Hi! It's Scott from Brick by Brick. I love to repurpose materials—use materials in ways different from their intended use. One of the things I save and reuse often are food containers. Don't toss those boxes; use them in the classroom. Here are some things we've done with food boxes and containers.

We like to cook and play grocery store. Those food boxes add to our play. In fact, I like to use them instead of play food. Sometimes I buy smaller versions so I can use the boxes. 


We have used the containers in our blocks center. These containers add some additional elements to our constructions. I put these containers out and told kids they could use them if they wanted as they built. They had a great time exploring. (See more about this activity on my blog.)


We've made musical instruments from containers. Put gravel or rice in small containers to make shakers. Use larger containers as drums. Instruments can store inside these larger containers, too. (Read about our small shakers and larger shakers.)


Containers have even helped us paint. We put paper inside an oatmeal container (or similar container). Drop in paint-covered marbles or balls, put on the lid, and roll it around. (This post has more information about that activity.)


We've also used containers for these activities—
  • A feel box or guessing game - slide a large sock over an oatmeal container and place items inside
  • Puzzles - cut fronts from cereal boxes and cut the fronts into pieces
  • Books - cut labels from containers and boxes - place in a small photo album; or mount the labels on poster board and bind together with yarn or binder rings
Rescue those containers from the trash can (or don't toss them in the first place!). How have you used food containers and boxes with kids?


My name is Scott, though most call me Mr. Scott. I love teaching preschoolers and kindergartners. I have been working with kids for over 25 years. I've been a teacher, preschool center director, volunteer, curriculum writer and editor, and workshop and conference leader. I blog at Brick by Brick.

Sunday, January 22, 2012

Creative Movement in the Classroom -- Tips for Teachers!


Hello EC Community,

I wish you the best as the new year of 2012 unfolds!  In my last blog post, I offered a complete movement lesson inspired by the many fun and adventurous aspects of the winter season.  I hope you have had a chance to try out some or all of these ideas with the children in your care.  

I think that now would be a good time to give you some helpful ideas for getting the most out of your movement sessions, both from the classroom management side, and  to maximize the children's enrichment and enjoyment.  Below are some tried and true suggestions that I have gleaned from my many years of dancing with children.


Tips for Teachers for 
Introducing Creative Movement Activities

Many caregivers and teachers may not have experience with dance, and may be uncomfortable offering creative movement to children. You may think that bringing dance into your early childhood environment could lead to a situation in which the children are not in control. However, one of the gifts of guided creative movement is that it helps children learn to control their bodies and develop awareness of moving in the space with other children. As children learn awareness and body control through movement, they become familiar with following your instructions, listening for cues, and respecting others as they move together in the shared space.

Remember, you don’t have to be a musician to sing and play instruments with the children, you don’t have to be an artist to do art projects, and you don’t have to be an expert in theater to offer dramatic play opportunities.  By the same token, you don’t have to be a dancer to dance with your students.  Movement is a natural and fun outlet for children, so use these simple tips to get started!

Carefully Explain Your Expectations

Before you begin a movement activity, create clear boundaries in the space.  You might say to the children, “This is an activity that we will do standing in one place.  Find your spot, and imagine you are in a bubble.  Now touch all around the inside of your bubble.  It is like a circle in space, isn’t it?  You are going to dance inside of your own bubble.”

NOW EXPLORE THE BOTTOM OF YOUR BUBBLE OF SPACE!


If the activity will be in a larger area with the children moving about as a group, delineate the space and explain it carefully to the children (“We will be moving around in the area that is covered by the rug,” or “We are going to use the space inside these lines.”)  Allow the children to walk the perimeter of the space to reinforce the outer boundaries.

In addition to concrete spatial boundaries, give other instructions to the children before you start, based on the nature of the activity as well as your expectations.  You might remind them that we dance with our bodies, and only use our voices if the teacher gives permission.  You might also remind them that other children are dancing in the shared space, and it is important to be aware of and respect others while dancing.

Verbal and Visual Cues

It is very helpful to introduce a cue during movement activities that signals the children to stop immediately.  Explain to the children the importance of responding to that cue, and remind them that it is for their safety and the safety of their classmates.  You can use a visual cue, such as a stop sign, a picture of a red light, a puppet, or dimming the lights.  Or you can use an auditory cue, such as clapping your hands or tapping a drum or tambourine.  Starting and stopping music is another good signal: dancing while the music is playing, and freezing when the music is paused. The important thing is that the children get used to stopping on command, so that you can immediately rein in the energy and continually guide the activity in the way you are most comfortable.

FREEZE STRAIGHT AND TALL WHEN THE MUSIC STOPS!


Incorporating Movement into the Daily Routine

Introduce movement activities gradually, so that the children learn to move together and become comfortable with the guidelines you have set.  A short activity such as a greeting or circle time dance can serve to familiarize the children with the expectations of a movement session.  Repetition of the activity is another way to accomplish this, so that moving together becomes a routine and fun part of the day.  Children will develop favorite activities, and will also want to add imaginative variations to them.  Inviting and incorporating these variations will not only give children ownership of the activity, it will make it a more creative and enriching movement exploration.

Another idea that can help make movement a comfortable and fun experience is to begin with very familiar music, such as a classroom favorite song or instrumental selection.  Devise simple movements (or let the children contribute ideas), and then repeat and expand this every day.  Once you have done this, you are ready to move on to other activities.

The most important tip about movement is that it provides a new avenue for learning.  Children learn by doing, and movement is a fun and accessible way for children to learn concepts kinesthetically.  Using playful and enriching movement activities in your early childhood environment can open up new and enjoyable opportunities for learning.  Allow the movement explorations to evolve as children contribute suggestions and ideas, and you all will be rewarded with a rich movement adventure.

Keep on dancin',

Connie

More detailed information on the benefits of movement, tips for teachers, and creative ideas for the classroom, is available in my March, 2010 article in NAEYC's Young Children
magazine, which was reprinted in the August, 2010 Spotlight on Teaching Preschoolers 2.  You may access this and other articles at my website:


Saturday, January 21, 2012

Sing like nobody is watching!

Leeanne A - Kreative Resources
One of the most enjoyable times to sing in my toddler classroom is during a transition time – just before lunch. We are usually sitting at the table waiting for the kitchen lady to deliver our food, so we may have a good 5 to 10 minutes to sing together. The songs we usually sing are the common ones we already know and enjoy. The children select the songs as we go along. They usually pick the ones that are deemed fun, based on their actions and the level of excitement they evoke. Some of the children may join in with great enthusiasm and some may simply observe, listen and then join in when they are comfortable. Many are confident enough to sing and do the actions involved in singing the songs. They imitate one another in the manner they deem correct for the song being sung. There are usually smiles all around and each child stays involved at some level.
I always feel that the times we sing together go very well, as none of the children remove themselves from the situation, nor do they fuss or complain about sitting and waiting until we get through our repertory. In fact many of the songs we sing a number of times, based on the requests of the children. I saw children who usually sit back and observe try out some of the songs and do some of the actions. So the more we engage in singing together the more confident some will be in joining in. Even if some don’t sing the entire song they may simply try out some of the words and make some of the sounds, which is a great stepping stone to language and literacy. This is such a great time to socialize and to make us all feel good as we continue through our day.
So sing like nobody is watching!
Songs we like to sing!              

Friday, January 20, 2012

How Parents Can Integrate Math with Reading

How Parents Can Integrate Math with Reading
By Danny Brassell, PhD

Welcome to my third article for “PreK + K Sharing.” I am passionate about helping parents, teachers and administrators create a lifelong passion for reading in children. Looking back at my past blogs, I see I offered some general reading tips for parents of young children (blog 1), as well as ways parents can help improve their children’s vocabulary.

In this installment I’d like to focus on how to integrate math with reading. First, I’d like to briefly talk about a fun approach one school uses to excite children’s reading passions. Then I’d like to dive deeply into how I use great books to spark my children’s interest in math.

Pick up almost any newspaper or watch the television news nowadays, and you are bound to hear about how far behind Americans lag their international counterparts in math. Why is that? I’d argue that the current school system addresses math as an abstract concept rather than a practical daily skill. Most kids – and adults, for that matter – do not see the usefulness of geometry, algebra or even basic deciphering (“that’s what calculators and computers are for,” I’ll often hear). As your child’s parent, you can foster a love for math in your child.


My eight-year-old daughter and six-year-old son attend a lovely neighborhood school that sponsors an annual family math night. Parents and children get to shuffle from station to station, measuring objects or telling time, playing addition bingo or guessing the number of jellybeans in a jar. Upon completing each station, students earn tickets that they can redeem at the end of the evening for various prizes. Not too complicated, yet this annual school function that only lasts from 6-8 p.m. on a Wednesday evening in January has evolved into an event that students talk about for months. The Parent-Teacher Association created the event, and it is a hit with kids and parents alike.


Math was always tough for me as a child. I managed to get the concepts, but I was never interested in them. Once I became a teacher, I quickly realized that I could not adequately teach students subjects I had no passion for, so I set out to make math fun. While I did not think up the wonderful family math night that my children’s school offers, I did create plenty of games. More importantly, I read tons of fun, math-oriented books to my students, and I do the same with my own children at home today.

Here are a few “hits” you can share with your children:


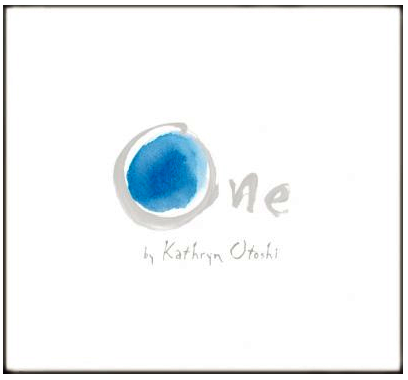
One by Kathryn Otoshi. Absolutely one of my favorite read-alouds. It will take less than five minutes to read, but high school students enjoy this book as much as preschoolers. It tells the story of Blue, who might not be as calming as Green or vibrant as Yellow, but Blue is cool with being Blue – except when Red shows up. Red always puts Blue down, and while the other colors like Blue, they are scared to defend Blue. Then One shows up one day and tells Red a thing or two, prompting the other colors to intervene on behalf of Blue. Your children will learn about numbers and counting and colors, but most importantly they’ll learn how each of us “counts” and sometimes it just takes “one” to make a difference. It is an extraordinary book.


Missing Math by Loreen Leedy. I love getting my budding mathematicians excited about reading with great math literature, and Loreen Leedy is one of my favorite “math” authors. In this fun poem, Leedy introduces readers to what the world would be like without numbers, prompting plenty of giggles among your little ones.


Ernest, the Moose Who Doesn’t Fit by Catherine Rayner. From the publisher: “Ernest is a rather large moose with a rather large problem. He is so big he can't fit inside his book! Luckily, Ernest is also a very determined moose, and he and his little chipmunk friend aren't going to give up easily. With some tape, odd bits of paper, and plenty of enthusiasm, the pair constructs an enormous gatefold page by themselves, and everything fits together in the end.” And I can tell you that your children will want you to read this again and again. Simple, but endearing!

Of course, there are tons of great math books available to parents, dealing with concepts like patterns and shapes, operations and equations, time, fractions, problem solving – anything. Librarians and book geeks like me can help you with titles. Your responsibility is to sit with your child and introduce them to an exciting world of mathematical possibilities with great books.


Danny Brassell, Ph.D., is a father of three and professor in the Teacher Education Department at California State University-Dominguez Hills. He is the founder of The Lazy Readers’ Book Club, Google’s #1-ranked site for cool, “short book recommendations” for all ages.

For a list of math-oriented books for your child, email Danny at danny@dannybrassell.com with your child’s age, gender and interests and he will compile a customized list for you.

Thursday, January 19, 2012

The Queen of Hearts Symmetrical Heart Tarts

The arts are a great place to incorporate math and literacy. In continuing with our Fairy Tale Unit over at Painted Paper we read the poem “The Queen of Hearts” and created our own Heart Tarts!
We discussed symmetry, “the same on both sides”, and painted fun designs on the background.

Week one: Read the Poem “Queen of Hearts”


The Queen of Hearts she made some tarts all on a summer’s day;
              The Knave of Hearts he stole the tarts and took them clean away.
The King of Hearts called for the tarts and chased the Knave full score
The Knave of Hearts brought back the tarts and vowed he'd steal no more.

Art Activity:
1. Students fold a 6" x 6" paper in half then draw half a heart. Some students had a hard time with the shape so I performed open heart surgery on them! :)
2. Students then glued down the heart in the center of a 12" x 12" construction paper and started painting with tempera paint using simple designs on top and around the heart.

How fun are stripes and polka dots! Imagine any type of pattern. 
Just make sure they paint on both sides of their paper.


Let projects dry.


Week Two:
Students used oil pastels and drew more designs around the heart. The sensory experience of using oil pastels and feeling the pastel glide across the paper is something a student never forgets!


 Put your hearts together and show some L O V E !!!!!


Note from the editor: This post has been added to our own linkie -- here at PreK +K on"
 ALL THINGS PAINTING -- in an effort to help you stay inspired!

PreK + K Sharing
Related Posts Plugin for WordPress, Blogger...