Pages

Saturday, June 30, 2012

Just Plop It

Play counts! 
Let children learn through play. 
Let them explore, make messes, try and fail. 
Let them handle conflict, control themselves and ask for what they need.
Let them observe effects and figure out the cause.
Let them solve problems, own discoveries and feel empowered....ALL through play!!

Hello! My name is Denita Dinger and I am a defender of play and a professional brain developer.  I am also a self-declared "plopper".  Through my 14 years of operating a family childcare business, I have had the privilege of observing children, ages 2-6, make sense of this wonderful world we live in. I have also discovered the art and value of the "plop".

A plop, by my own, self-made definition is (insert vision of me putting on instant, IQ-boosting spectacles and clearing my throat):   an object, book, story, song or mystery word that is quietly placed (aka: plopped) into a child's environment while sharing no (zip, zero, none, notta) pre-conceived adult ideas in order to give ownership of discovery to children.  The "plopper" is prepared for what could POSSIBLY happen...but is willing to drop those ideas in order to follow the usually BETTER possibilities a child's mind imagines!

I use to have a love affair with planning. I can't tell you how much I loved filling planners with activities, songs, games, and materials that I KNEW young children would greatly enjoy.  I knew how long they would want to do each thing.  I knew that they would want to learn about dinosaurs for two weeks in April.  I loved planning for months in advance and looking at all the learning that was going to happen.  I loved marking off my little check list of all the early learning guidelines that we were going to meet.  Bottom line,   I. LOVED. BEING. IN. CONTROL.


I learned a lot during those years of being in control, leading young children.  Those years of being afraid to trust children to lead me.  Those years when children asked me what we were going to do every single day, unable to lead themselves.

1)  When one forces children do something, one is going to have discipline issues.
2)  I took it personally when "my crew" didn't like MY hard work and planning, and found myself making them do my "great" ideas anyway because I just KNEW they would see the light.(see #1 for why this is a problem)
3)  Children have their own ideas of what they would like to do.
4)  When children are followers instead of leaders too much, they lose confidence in their own ideas.
5)  Sometimes, MOST times....better, random and spontaneous things happen, that plans can't possibly be made for, that are way better then any plan ever could be.
6)  When wonderfully spontaneous things happen enough, one accepts the fact that over-planning and leading is not such a good way to accomplish early learning goals......(insert LIGHTBULB!).

These lessons are what led me to being a "plopper".  I loved to plan, but I had realized the negative side of being too rigid and too planned.   So...I began planning a plop.  It was the perfect marriage between my love of planning, and giving children open-ended opportunities to be in charge of their own learning.

Here are a few plop examples to help explain the concept of "plopping" and get you on your way to happily following children, yet being able to plan too:

Example #1
The "plop":  "Where's the Dragon" by Jason Hook.

My adult ideas:  none really, I just thought it was a good book that would certainly inspire some amazing imaginative play

What evolved:  over a YEAR of daily, imaginative, dragon hunting fun! There has literally not been a single day in the last year that have not involved a dragon or two!


Upon the initial reading, this book became a hit.  The children were instantly enthralled with dragons.  Add to this book the obvious props of dragons and you have endless imagination possibilities! ( WHY is imagination important?  Imagination is how we solve problems, it's the beginning of invention...imagination is VITAL and should really be a learning goal or learning guideline...whatever you choose to call it.  Imagination is found in PLAY and the right "plops" can foster some simply amazing imaginations!)


Ever since the first plop of this book a YEAR ago, the children are constantly keeping their eyes out for dragons.  I hide dragons in all sorts of places....sometimes high...sometimes low.  They need to use teamwork and problem solving skills in order to retrieve the dragons once they find them. 

I even throw in some delayed gratification by hiding the dragons in very difficult to find places!  We have hunted for days...but always find success through hard work and determination (VALUABLE life-long skills!)

Can you spot the dragon?  According to Grandpa, "...you must look high and low and believe hard enough" in order to find dragons!
 As soon as Gavin spotted the dragon, off he went to get the tool he needed in order to solve the problem!  The tool of choice for this mission?  The "grabbers" (another of my favorite plops... look under "Grabbers" in my blog, Play Counts,  for other uses for "grabbers" in your program).


Visual planning, small motor control and sheer determination and persistance are at work as Gavin focuses on getting the dragon down from it's hiding spot.

 Problem solved, now it's time to take this dragon for a ride in the sky!!  Fly dragon!  Fly!  (and fly Gavin too....on the sense of pride that comes with solving problems!!)

Recall the source of all of this learning (imagination, sense of pride, teamwork, solving problems, persistance, determination, muscle control (aka: prewriting) and visual planning and tracking)....a simple plop of a book and some dragons that started to mysteriously appear.

The rules of plopping:
1)  Plop quietly...without suggestions.  When children ask about the plop, respond with an open-ended statement like "What do you think it is?"  "What do you think it does?"  "See what you can make it do!"  etc.
2)  Listen and follow the children.  Add to the plop to keep the curiosity and creativity flowing.
3)  You do not have to plop something new every single day.  Some of my best plops have lasted well over a week.  Sometimes with additions to the original plop, and sometimes without. 
4)  There is no right or wrong way to plop. 
5)  Give the children TIME to explore the plop.  Just because interest isn't there immediately, doesn't mean your plop is a flop!  Be patient. 

Example #2

The "plop": 
  • cardboard corner supports I found while dumpster diving (Hey...ya gotta do, what ya gotta do!  There are GREAT treasures to be found in appliance store dumpsters!)
  • bowls of paint
  • 2" diameter rubber balls
  • a treadmill box (this box has been a part of our environment for years and years...it plays MANY roles)
  • white paper to line the box
My Adult Ideas:  ramp painting

What evolved:  ramp painting loaded with way more learning then I originally realized

I plopped the corner supports, bowls of paint, small balls and our "creativity zone" box (aka: a treadmill box that has been in our environment for years...it has been countless things!) lined with white paper.

Here is what evolved:

Ella and Ty are debating on the angle they should be holding the ramp.  Can you tell by Ella's expression that she does not believ Ty is right?


It was wonderful to overhear the conversations that involved.  I heard vocabulary like: angle, higher, slant, faster, slower, zoom, trail, path, bounce, smooth, roll, tip, rest, tighter, muscles and messy, just to name a few!!

I love giving children opportunities to organize themselves.  Teamwork, cooperation, collaboration and compromise are life-long skills.  Notice how there are the "Ramp Holders", the "Paint Dippers" (in the background, dipping the balls in the bowls of paint), and lots of "Quality Assurance" workers making sure each job is being done correctly!


Example #3
The "Plop": 
  • foam beads
  • container with 3-4 inches of water
  • several (never enough for everyone...if children never encounter conflict, they don't learn how to handle conflict) 6-7 inch long pieces of plastic lacing tied in a knot at one end. 

My Adult Ideas: 
Simply taking something we normally do inside in a dry environment and taking it outside plus adding water to it.

What evolved:
Read on and see.....the imaginations of young children never ceases to amaze!!

 SO.....what evolved?

At first, they were making necklaces, until they realized the lacing was too short, and couldn't possibly be used for necklaces.  The gears started turning.

Soon it was discovered that their creations FLOATED!

 The children took complete control of this plop by adding to it.

 I admire a child's intuitiveness when they add other tools and materials to what I've plopped, in order to accomplish a vision that they have!

What did they add?  The plastic rain gutters and the hose.  An idea had been born, it was time to test it out!

WATER SNAKES!  Finally, a name for the creations. Literally hours of fun came out of moments of curiosity, trial and error and imagination!
There was so much going on here.  Let's take a moment to dissect the learning.  Being able to dissect play is the best way to educate parents on the value of play.

1)  sharing
2)  teamwork
3)  empowerment (using the hose is IMPORTANT, and children know that)
4)  trust (they know I trust them to let them use the hose knowing that they won't get each other soaked)
5)  organizing
6)  vocabulary
7)  science concepts
8)  trial and error
9)  cause and effect
10) sense of pride (not only number 3, but also successfully building their snake, and making it GO!)


Take a look at the next photo:  Alayna had learned through trial and error that the angle that she held the sprayer made a difference to how quickly her snake traveled.  She is not just randomly holding the hose.


Good old trial and error!  Quite possibly the best way to learn!  Gavin discovered that the dragons are too heavy, and do not float.  Therefore, they will not float down the ramp, AND they prevent the water snake from being able to move too!

It was fascinating to watch his learning process as he picked up the dragon, turned it upside down, and tried again with the same results.  Picked it up again, taking a closer inspection, placing it back in the gutter with, once again, the same results.  Finally he exclaimed "Hey guys!  The dragons don't work!  They don't float like the snakes do!" 

Appreciate how important sharing what he learned with others made him feel.  Empowering young children....through foam beads, water, a toy dragon and plastic lacing...who knew!?

Once again, children organizing themselves.  This line was formed without a word from me.  When it is a child's plan, their idea, patience comes much easier I truly believe!


Take these three ideas, copy them exactly, OR...better yet, adjust them and make them your own...the possibilities are really endless!  Add some shaving cream to the foam bead plop.  Add some square objects to the ramp painting plop for a little practice in learning through trial and error!
 Through it all, remember:  PLAY COUNTS when we let it!!

Until next time....go forth and plop!

Denita Dinger
Defender of Play
Professional Brain Developer
Plopper of Possibilities


Friday, June 29, 2012

Child's Play: Living in a Toy Store

LLiving in a Toy Shop: Choosing toys for your child with love and attention

Editor's Note: Every now and then in my travels I meet someone that is totally passionate about their work on behalf of children. I thought it would be fun today for you to meet someone that 'lives' in a toy store. I bring you Ellen the brains and heart of Child's Play, in Sturgeon Bay, WI. -- Debbie Clement


Child’s Play was created over ten years ago by a Mom and a Dad of five awesome kids. This Mom and Dad were…and still are…committed to finding and sharing the best things on Earth for kids to play with. We believe in creativity, imagination and a child’s natural tendency to learn through play, and we hand-pick our toys to celebrate every child’s journey. 


Our family has grown up at Child’s Play. When our store opened, we had four kids under ten. Now we have five, two of them in college. As the kids have matured and their developmental needs have changed, we have learned what works…and what doesn’t! Best of all, we have had the amazing opportunity to play with our children and watch them grow through the toys we have been able to provide because of Child’s Play. After ten years, we also have the wonderful opportunity to share these toys with the rest of the world. 
photo of: How do you choose a toy for your child?


You could say we are obsessed…or you could say we just love the idea of giving our customers the opportunity to find the perfect toy for the child they care about. We don’t select toys because they are “hot” . We pick them because they have depth…because they grow with the child who will play with them…because they stimulate and engage. And so far, we have never sold a toy or a book or a game that we haven’t played with ourselves. 


The first question any of us asks when we greet a customer is, “tell me about your child.” Does he like dinosaurs…robots…building…and then we find just the right thing. Our store is organized by interest, not by age, and many of our toys span an age range of years. Our baby toys are always “growing” toys. We look for things that will work for a really young baby…and still be interesting for a budding toddler. 


photo of: Toy Selection for your Child, Choosing wisely


Games…games…games…we love them! A perfect opportunity for kids and adults to interact and learn together. We have hundreds of games for ages as young as three…all the way to games that appeal to teens and adults. We look for games that are low on the frustration scale and high on learning and fun. We have a selection of cooperative games, one-player puzzle games, board games and a whole bunch that don’t fit into any category at all…and we have played them all. 


Batteries…an interesting topic in the toy world…When we opened, we didn’t have a single toy that required a battery. Over the years, our philosophy about that has changed. Now we sell a few battery driven toys, and we have a very simple idea about that. We only sell battery toys if the battery is just a function of the awesomeness of the toy. In other words, we only sell battery toys that are creative, engaging, stimulating and provide some form of real education. We believe that kids (and their imaginations) should power toys…if the battery is a helper in this, we feel like it is a good toy. 


photo of: Selecting Toys for your Child


Fine Motor…Gross Motor…Developmental…Educational…there are lots of “buzz words” in the educational toy world. Most of all, we look for playthings that will captivate a young mind and hopefully provide all of those wonderful chances to grow and learn that every child should have. A child’s brain is designed to grow and learn…we hope to provide the beautiful, treasured toys that help along the way. 

Child’s Play is truly a labor of love. Everyone who works here has children or grandchildren…we play with everything before it goes on the shelf, and we encourage our customers to play too. Above all else, we try to fit the toy to the child or the family who will play with it. We know what works…and we learn something new every day.


-- Ellen Barlas --

Thursday, June 28, 2012

Ice Play Ideas

Summer is here and we have been trying to keep cool,  so I have been thinking about some artsy ice activities to make with my daughter. We did many ice activities last year and one in particular was Colorful Ice Sculptures in which we used water balloons that we froze. Another idea was Painting With Ice Cubes to create gorgeous colorful Art.  Now in my freezer I have a bunch of ice filled balloons and paint ice cubes ready to go.  I asked my daughter if she wanted to create more sculptures with ice balloon spheres, but instead she played with one of the ice balls like a ball kicking and rolling it around. Here are the pictures to show the fun.


To create Ice Spheres you need:
Balloons of all sizes
Water
A freezer

Fill the balloons with water and freeze. Simply peel the balloon away when frozen and have fun!


Very cold on your feet,  but icy fun for a HOT day!


More Ice/Snow/Frost Fun:
(Click on the caption or picture to bring you to the how to)


Hope these ideas will help you to keep cool in the Summer Heat!

Melissa Jordan blogs over at The Chocolate Muffin Tree. She is a former Elementary Art Teacher and soon to be High School Art Teacher.  Many of her ideas she does with her 5 year old daughter (soon to be 6).  She loves sharing her many creative ideas with her readers to help to grow a a creative life with children!

Wednesday, June 27, 2012

Montessori Writing Workshop


Hi, this is Rachel from Discovery Kidzone Montessori Adventures!  Today I am going to talk about writing in preschool.  Writing in preschool, really??  What all does that entail?  Isn't that "developmentally inappropriate"?  This is a subject I have struggled with in my quest to create a well rounded preschool program.  This past year I took an online Kindergarten workshop taught by Crystal Radke from Kreative in Kinder.  In her workshop she explained how to introduce a writing workshop in an early childhood classroom. I highly recommend taking her online workshop!! I used the practices that she taught and adapted them to our Montessori program.  Not only did a writing workshop help my students become better writers but it made me a better teacher and writer.  I am going to tell you the systematic approach I use in my Modified Montessori program to introduce writing at a very young age.  
In a Montessori program we place a great deal of focus on the development of fine motor skills before we introduce writing.  I consider many of our practical life lessons an introduction to writing workshop.  
Here are a few examples:
Flower arranging, operating a dropper, push pinning, and easel painting are a few practical life activities that aid in hand eye coordination, proper pencil grip and tracking.  
As the children are mastering their fine motor skills, new materials are introduced.  Metal insets, wood letter blocks and sandpaper letters are the next step.  These materials will start the process of combining language with fine motor development.  I believe this is an important step in the writing process in order for the child to have proper developmental skills and a complete understanding of language in conjunction with one another.  
Metal insets are similar to stencils, however, they are two metal pieces.  The children practice proper pinscher grasp by grabbing the knob on the middle piece, they can trace the positive or negative piece.  This is a wonderful tool to teach writing skills.
Wooden letter pieces, playdough letters, sandpaper letters, wikki sticks, letter puzzles and bead letters are all activities we use for fine motor development, letter recognition and word work.  
Once a child is familiar with manipulating letters we begin to introduce words, in the same way as letters.  They begin by building the words before they write them.  To practice these skills we use the insta-learn board, the moveable alphabet, letter and word tiles.   
In the workshop Crystal talks about drawing pictures using 5 colors.  We use directed drawing methods to start out.  In our Handwriting without tears curriculum it teaches us to use our wooden letter pieces to build "mat man".  This teaches the children to build a picture using shapes.  
We do drawing workshops at least once a week and the progress they make in this area is amazing!!  These drawings were done in March.  
The next step in preschool writing workshop is adding labels.  We do a group writing lesson where we brainstorm and write the labels on a chart together.  During work time they draw a picture and add labels.  
Drawing and writing labels is a great step in preschool development. It teaches the children to love writing, and that writing has a purpose.  The final steps in the writing process for preschool is practice, practice, practice.  We write menus, recipes, phone numbers, food labels and any play based practice we can, to reinforce the love of writing!  I never knew how much joy a writing workshop would add to our program and I am so excited and grateful I incorporated it in this year!  I can't wait to start planning for the fall.  
Rachel Supalla 
Director and Lead Teacher 
Author


Tuesday, June 26, 2012

Summer Sunflowers

By Laura Eldredge

Seeds are planted in Spring ... but some don't fully bloom until early Summer!  Sunflowers are great to plant and have children watch them grow, taller and TALLER over a period of time.  They can even measure the flower growth with their own bodies (up to their ankles, knees, stomach, head)! 

After sunflowers have started to grow, children can enjoy some books and activities to go along with what they are learning about sunflowers.

Books
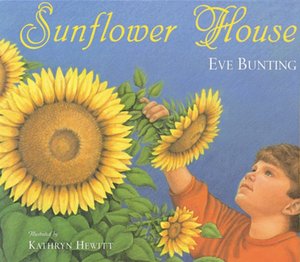
The first book is called "Sunflower House" by "Eve Bunting.  In this story, a boy plants a bunch of sunflower seeds in a circle.  The sunflowers grow and grow, and form a "sunflower house", that he and his friends play in (doesn't that sound like fun?!). The story also features the life cycle of plants, as the sunflowers wither and seeds are left on the ground to grow again next season.


Another lovely story is "The Sunflower Parable" by Liz Curtis Higgs.  This story focuses more on the hard work and patience of gardening; but also has a message much deeper than just about planting sunflowers. 


Paper Plate Sunflowers

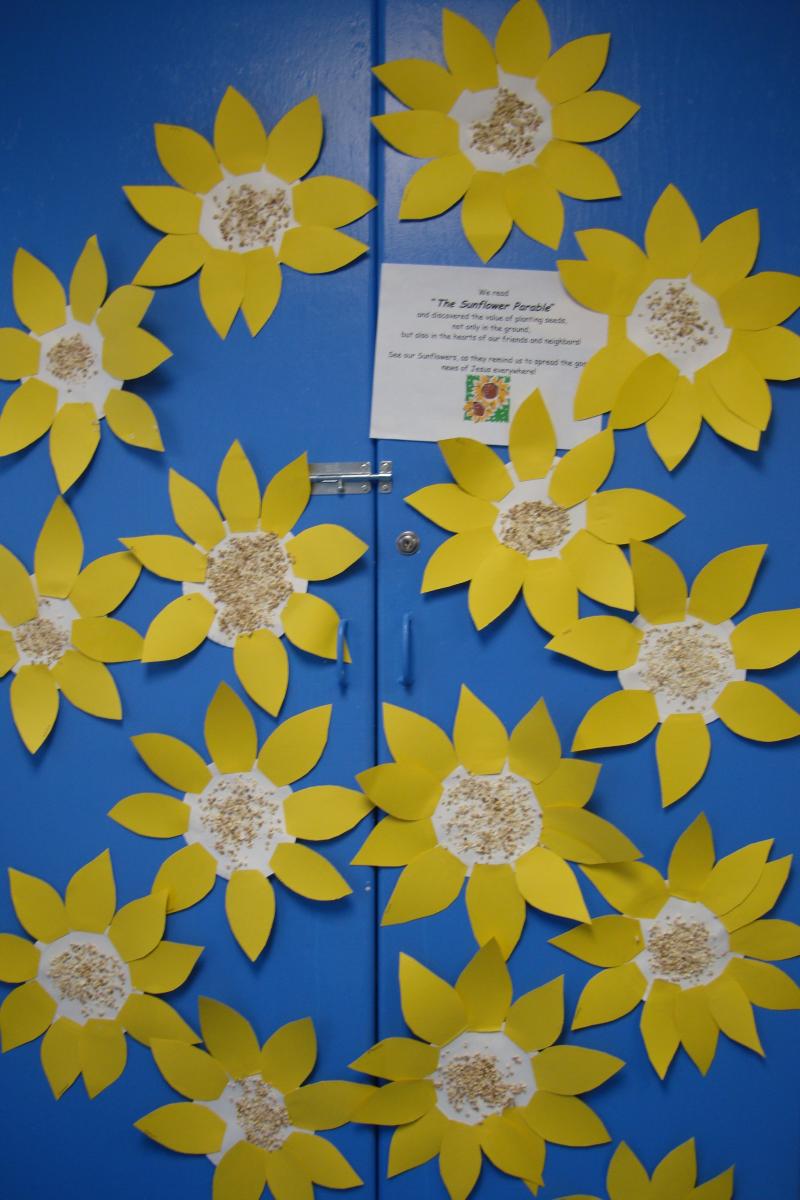
After viewing some real sunflowers, children can try to replicate them with paper plates.  First, prepare paper plates for the craft by cutting off the outer edge of each plate (trimming about 2 inches).   For younger preschoolers, you can pre-cut yellow petal shapes - older preschoolers can practice their cutting by making their own petals.  Have children use a glue stick to glue around the outer edge of their paper plate circle - and then stick on their yellow petals.

Next, have children put white glue on the inside of the circle and have them spread it around. Give them "seed-like" items to sprinkle on the inside the sunflower (i.e. oatmeal, dried corn cob, bird seed, sunflower seeds).   Another option is to have children use brown paint to paint the middle of the sunflower and then spread the "seeds" on top of the paint.


Happy Summer!

Laura Eldredge is a teacher and curriculum coordinator at a NAEYC accredited early childhood program in Connecticut. She also co-founded the website The SEEDS Network, as a way to provide early childhood professionals with ideas and resources that support them in their quest to provide quality care and education to our youngest learners. She blogs at www.theseedsblog.com.

Monday, June 25, 2012

Summertime: Letter of Re-fresh-ment

Dear Friends of Our Children, 
photo of: purple pail on the beach, bucket in the sand, reflection on waves in the ocean
Summer: the Season for JOY!
Happy summer to all! Summer is such a wonderful season and opportunity to celebrate the oldest and best ways to be with each other and especially our kids. Most of the year, we and they are programmed and scheduled and tested and stressed by a society marked by Developmentally-Inappropriate Practices! So here is a chance to relax a little, laugh a lot, sing, skip, feel hoppy and light hearted and hopeful. 

Most of us don't have the time to just do things for their own sakes! Like sing a song, paint a picture, take a walk, jog around the neighborhood, picnic in a nearby park or watch the stars at night. With our children, we
have so many possible 
joyful moments together. 

I was just on WOSU FM (our local NPR station) talking about creative education and I pronounced (in my usual impartial (??) way that I would rather have any child I love take a walk around the block with a person open, spontaneous, flexible, curious, cheerful and warm than take a trip around the world with a strictly programmed, stiff, close minded, authoritarian person. The walk around the block with YOU, wondering and wandering, observing and noticing, humming and singing, talking and swinging, stopping to smell the flowers, sharing and enjoying could be the GREATEST treasured day of summer for that child- for our children. 

So- as the days spin by too fast, I hope we don't lose this special opportunity to be with our children in loving, joyful and, yes ~~ tis a gift to be simple, ways!~~  


photo of: Daisy with Helen Keller quote


Happy summer, dear family of early childhood educators! 
Peace and Love, Mimi Brodsky Chenfeld

Sunday, June 24, 2012

Our World is a Classroom

I'm sure you have heard of the Summer Slide.  If you haven't, it is simply how much a child slides backwards in his/her academics over the course of a summer when s/he is not in school.  There are many ways that families can prevent this phenomenon with their own children and it is NOT by skill and drill flashcards or sitting your child down for formal lessons every day. 
I use our world (along with every day fun) during the summer to continue my own childrens' learning throughout the summer.
My boys (ages 5 and 7) and I went for a walk in the City Forest on the bog walk and here are just a few examples of the learning situations that arose naturally during our expedition.
Signs are everywhere and children are naturally drawn to them.

 
Children love signs and, luckily, in our world they can be found everywhere you go.  This set of signs pulled my two little ones right in, so I jumped on it!  My little one found all of the "nos" and used the pictures to guess what the rest of the sign said and my big boy (who can read all of these signs) got to tell him how close is guess was. 
Science was everywhere during this trip.  Take advantage of your surroundings to teach your children about their world using (as in this example) informational text.  My boys love nature and were very interested in finding out more about the animals and plants there in the forest, many that they'd seen before, as well as many they hadn't.  You could always pull up web sites of some of the creatures or plant life your children find in their surroundings on the internet to introduce your child to informational text.
The boys made a game up that they couldn't step on any of the "new" boards.  This led us into a discussion about why the new boards were there and how they decided which boards that would be replaced.  Yes, simple concepts for us, but not so much for young, inquiring minds.  I am always planting seeds and trying to get them to wonder and think creatively and sensibly.
On the 88th pallet, my big boy noticed these little number plates labeling each one.  He, of course, started identifying the numbers sporadically while my little one identified numbers he knew as well (8-8 vs. 88).  They noticed that numbers increasingly got larger and so I asked them guess how many pallets there are on the entire boardwalk and they came up with 500 and 600.  I thought these pretty great estimations since the number ended up being:
Obviously, some summer fun will lend itself much better to learning than others, but no matter what you are doing there is something to be learned everywhere you go and in everything you do.  Help a child stay off the summer slide by inviting them into our worldly classroom!

Saturday, June 23, 2012

Substitutes for Dry Erase Boards

Hi! It's Scott from Brick by Brick. I love to repurpose materials—use materials in ways different from their intended purpose.

My kids love to use dry erase markers for writing and drawing. We have a large board in our room, a board on our easel, and small boards to use at the table. So we can have lots of different experiences with our dry erase markers. But what if you don't have a board? Or if you need more boards for kids to use? Here are some things you can repurpose to use as dry erase boards.

Plastic Plates - A quick and easy alternative that may already be in your resource room or classroom. You may be able to find large ones, small ones, and ones of different shapes to use.


Binders or Notebooks - Choose binders that have a plastic cover into which you can slide paper. If the binder is white or a light color, use as is. If it is a darker color, slide a piece of paper inside so you can see the marks. You can also slide in a picture or activity...or words to trace. (Thanks, Ms. Jessi, for this idea!)


Page Protectors - Slide a piece of paper inside or use on a light-colored table or clipboard. You can also slide activity pages or words to trace inside, too.


Stove Burner Covers - Find ones that are plain, with no designs. I love the ones I found - we use magnets on them, too. And flip them over to use as holders for art supplies or other resources. (Good repurposing, multi-tasking items!)


Laminating Film - Don't discard the remnants from your laminating but write on it instead. Tape pieces to a table or a tray. Or laminate heavy paper and place on a clipboard.


Window - If you have a low window in your classroom, you already have a great dry erase board!


Have you found a good substitute for dry erase boards? I'm always on the lookout for more ideas.